Screw Tires for Sale!

evil screw tires
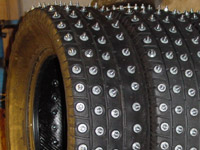
Quick – before I go to ebay with’em.
They are were 215/50/14 Yokahama Slicks.
They have 168 (1/4″ X 20) 1″ long bolts with 2 washers and nylon lock nuts on each tire.
They have been sealed on the inside with bead sealer.
We also used a bottle of slime (slime.com) for insurance.
No tubes – mounted on 14″ 5X100 Steel rims.
Never lost air – very dependable.
They look and drive *fantastic :)

I used these on my rally car to win 1st in “modified class” at the 2004 BMW Ice Race season. We found the slicks to have 2 advantages. 1. Stiffer sidewall, and little rollover. 2. Steel belts throughout the whole face of the tire for a stronger / longer life. I raced these 4 times for a total of 32 hours on the car.

I’m looking to sell the whole package:
Tires on rims: $450

I have no idea what other cars Neon rims will fit on. So, do a search. ;)
Comment or contact us.
Buyer pays shipping – but I don’t “really” want to ship these. I’m in NH.

Thanks! – Kris

Trampled under foot. Could you call this IV?


This picture is the best way for me to describe what this project looked like for the longest time. I thought I’d share.

Rally computer, intercom, and skidplates. Those are the last big things. Don’t get me wrong, there is a “little shit” list that goes out past the Sun, but there is no more “rollcage”, “suspension”, or “head gasket” on the top. The car has touched the ground again and we’ll begin suspension testing this weekend. First reports look good. She sits a lot higher in the front now. I’m trying to source a stock rear swaybar to curb the impending expected understeer from the front being stiff and the back being stock. (Thanks for the info Nate!)

Topeak Panoram
Speaking of rally computers: I decided to resurrect the ol’ Topeak Panoram bicycle computer that I bought a while back. I couldn’t seem to find the mount, cable, or magnet from it. I went on Topeak’s website and sent a nice email to them regarding it’s destruction. I then searched for a replacement part number. I found one site that wanted $28 for it! (The whole computer + mount new was $50 shipped.) Further searching revealed 3 matches. $28, $24.99, or $9.99. Hmm. *Click – order. At this price I was considering ordering 2, one for the WRX, or as a backup.

This morning my email bings. It’s Neal from Topeak. “Give me your address! We can send something out.” Sweet. Two for (one third) the price of one. This will get some sort of mileage device in the Neon. Compete with it?? I dunno. I would love for a Brantz International Pro to show up via FedEx, but until that happens…

So this weekend we have some brake bleeding to do, install some new headlights, maybe get the rally rims and tires on her for testing. I don’t know if the weather will cooperate, but I’d like to do a photo shoot – get some snazzy pics for sponsorship bids.

Finally I was going to quote some Led Zeppelin lyrics, but it seems that the “correct” lyrics to “Trampled Under Foot” are as much on an enigma as my rally Neon project.
Greasy, slicked down body, groovy leather trim
– or –
Grease me straight down, good electric

Feather-light suspension, Konis couldn’t hold
– or maybe –
Feather-light suspension, Coils couldn’t hold

Too bad Mr. Plant didn’t actually write lyrics for the song down anywhere. It’s about a car… I think.

ZE-NEON progress update numero III.

I’m going to try to do an update without getting into a huge diatribe about what’s happening in my life. That’s what planetkris is for anyway.

Now back to the show! Compression test is done. I have 180psi in all four cylinders. The rear suspension is done. The tip that Chris wrote me worked. After having the boys over at Town Fair Tire take a crack at them with the torch, James returned with them last Sunday. Gobs of anti-seize later, they are back in. Christine and I worked all last weekend getting the bushings in. To my astonishment – I realized that I don’t have a rear sway bar.

I’m serious – I thought all cars had them. I thought the Neon had one. I’ve been under the car how many times?? Only now do I realize this?! So, I added that to the list of things that I have to get at the junkyard this Saturday. I even have a nice new set of bushings for them!

Home Depot is my kind of race store. I think if they tried a little harder, they could dominate the street touring market with a selection of hardware re-branded for car enthusiasts. Gutter guard? No, no – “Bumper Screening.” PVC Pipe? Ah, yes – “Intake modification.” Are you going to buy a $3 hose clamp at AutoZone, or get 3 for a dollar at The Home Depot? No brainer. They just need to start carrying METRIC hardware. I know some do, but not all. Embrace the metric system people! Fractions were never fun in third grade and I still don’t know (nor care) if 3/8″ is bigger or smaller then 1/2″. 8 is more then 2 goddamnit!

*cough. Ahem. From the aluminum angle stock I purchased at the HD, I fabricated some bad ass mud flap mounts. Stainless hardware is the way to go here. Now she’s ready for some truck sized flaps. This weekend I have some more finish work to do. Bleed brakes, flush coolant again, paint front bumper, finish wiring, etc.
Bling!
Almost forgot! I bought some bling. Every car should have clear headlights. I hate the frosted, gel, headlights on the Neon. I found that a lot of other people do too! So I picked up a set of these from neoncars.com for a lot less then some other dealers had them for. Go Froogle!

Rally Neon progress update II.

We gave up on the rear suspension halfway through the weekend. The ten inch bolt that goes through the rear knuckles is frozen solid. I called James at work and told him to source not only the bolts, but the rear knuckles. All of us took turns beating and bashing it with the sledge hammer.

We did beat the checklist down pretty hard. The front suspension is complete and back on. New struts, new springs, and new bushings. The old bushings had to be burned out and the parts cleaned before re-assmbly. Lots of bushing lube, anti-seize, and grease. I can’t wait to get the car back on the ground.

Saturday evening we buttoned up the motor, filled her with juice, and turned the key. Similar to the sound a cat makes when coughing up something unpleasant, the Neon hoarked and came to life. There was some scary rock crunching sounds that we found to be coming from the power steering pump belt being too tight. Once that was cleared up, we brought the motor up to temp and checked for leaks. The repairs we made to the radiator were successful.

Sunday was a more relaxed day. Flushing and adding radiator cleaner to the cooling system. Trimming some interior pieces that needed to be squeezed between the rollcage and the chassis. Zip-tie’ing wires up and out of the way. Checking bolt locations and tightness. Work has begun on the new foglight wiring harness, and James made some plans for the tools, jack, and tire that will sit in the trunk.

I have a good list of stuff for the next junkyard run we make. I have a list of parts that need to be ordered to finish up this “little” project. The Memorial Day goal is well within reach.

Kris’s Pics: April Garage Day Pictures from rallynotes.com
Sean’s Pics: April Garage Day Pictures from trunkmonkey.com

Maine Forest Rally – Mark your calendars.

I’ll do this in “Press Release” style: FOR IMMEDIATE RELEASE!

Manchester, NH. Rallynotes.com announced that it will be attending several events this summer with their completed Dodge Neon Rallycar. “The car will be ready for Memorial Day.” said Kris Marciniak. “We have been working day and night to finish up a seemingly never ending to-do list.”

With the repairs on the head-gasket complete, the newly fitted suspension, skidplates, and safety equipment “ze-neon” will make an extended highway trip to visit family in New Jersey for Memorial Day weekend.

Following that will be a shakedown test & tune at the “Big Lap” TSD Rally / Rallycross on June 26th & 27th. “Any changes that we need to make on the car and any stuff we break – we will be able to fix before Maine.”

July 30th & 31st. The Rallynotes.com team will be running in their inaugural event: The Maine Forest Rally. Starting in the town of Rumford, crews head North up to the smooth logging roads that cut through the deep forest that touches Canada. On Saturday they will join up with the Pro Rally teams that started Friday for a one day Club Rally event. “I’m looking forward to it.” said Co-Driver James Mackey.

As for other events Kris noted: “Don’t be surprised to see us at an autocross, rallycross or even a car show. I want to get as much seat time as possible in the Neon before I run my first stage rally with it.”

The Rallynotes.com rally team would like to thank the following people for their continued support: Christine Wittish, The Trunkmonkey Racing Team, Hatch Manufacturing, Team O’Neil Rally School, rallydecals.com, The Jackson ‘Ice Race’ Crew, friends, family and others who have helped us along the way. Thanks for your support!

Rally Neon progress update.

neon valve coverLast night James clicked a few shots with his phone cam, we closed the Trunkmonkey garage, and headed home. I’ve got a lot started on ze’Neon, but I have a long way to go.

We’ve got the front end stripped. Frame, engine block, and transmission – are pretty much all that is left in the car. 10 head bolts and the crank pulley are all that remain of the head gasket replacement. The oil looked good. The coolant looked awful. All the fluids are out and a heap of cat litter is on the floor soaking up the drips. I hope to have the head off, cleaned, and back together by Saturday.

The struts and bushings have arrived. The front suspension is now in a purple box in the back of the garage waiting for painting, cleaning, and re-assembly. The rear suspension still needs to be stripped out. This can all be removed with a 21mm, 18mm (steering ball joint), and 13mm (strut tops and swaybars) socket wrench. We could – “If we had to.” – replace the entire front suspension in a 20 minute service.

The engine wiring harness is now in James’ hands. I found that someone had used butt splices to hold the camshaft sensor plug on. There was exposed copper wire when I took it off the motor. I can only imaging what would have happened if the computer stopped knowing where the cam was. James will asses, re-solder and re-tape in order to survive rally conditions. He also needs to build a harness for the KC Daylighters.

My goal: Maine Forest Rally. I don’t yet see the light at the end of the tunnel – but I think we can pull it off. We press on…

Rally engineering for fun and profit.

graysheeta.gifI plan at some point to go back to school. When I do – it will probably be for an engineering degree. Electrical, mechanical, or technical. I figure this degree will be fairly easy to obtain after building and racing a car in one of the toughest motorsports on the planet. I know it will break, but I’m not sure why. Changing: “That’s gonna’ break…” to something like: “Based on the stress load to the cross member, that’s gonna’ break and smash up those bits there…” So much more technical. :)

I’m in the midst of designing underbody protection for the Neon. Skidplates are an essential crucial part of a good rallycar. Now I actually have some experience in this area. I designed and sold some for the Impreza. The first mistake in designing a skidplate is making it indestructible.

Modern cars get pretty destroyed in accidents these days. Just a 20MPH hit to the front end with crumple the nose of a car. This is done on purpose to absorb the impact of a crash. Skidplates are there to absorb and deflect the impact of rocks and terrain on a car. So taking a giant (3/4″ thick) steel plate and bolting it directly to the front end will take the impact of a giant rock on the road – and force it directly into the chassis. Bending frame goodness.

Take a thinner / lighter aluminum plate. Bolt it to a tubular steel frame and position it 2″ away from the front end you are trying to protect. Now – upon impacting the “giant rock”; The plate has a huge gouge in it, the left part of the steel tubes are crushed, and the plate is now warped and un-repairable. The unibody front end that it was tied to has survived with minimal damage. That’s the idea at least.

An aluminum 3/16″ thick front plate. Tied to spring steel supports that cover most of the front end back to the firewall. A 1/8″ thick aluminum plate from the firewall back to the front seat floor pans. This will be supported by boxed tubing sections bolted to the side sills. From there on I will use plastic. Yes. Plastics do make it possible.

Okay kids, open your engineering notebooks, and take this down. High-Density Polyethylene (HDPE) & Ultra-High Molecular Weight Polyethylene (UHMW). You know that plastic that they make cutting boards out of? Well, it does a good job of keeping sharp rocks out of your gas tank. Great impact resistance, good operating temperature range, and it’s cheap. Like $30 for a 4′ X 4′ sheet of the stuff.

So now I’m making a list of parts and materials I’ll need to buy. I’m sure cutting, sanding, bending, and bolting will be in order. I’m also sure this won’t be the last set of skidplates I build.

Works cited: McMaster-Carr, plastics. McMaster-Carr, Plastic Material Comparisons. Machinist-Materials, Plastics Comparison Table Online Metal, plastics. Special thanks to the guys over at SpecialStage.com for providing the following answer to: “Skidplate Plastic?”

Suspension plans.

break me...
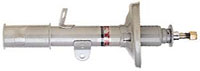
First in the long list of things I need to take care of is the suspension. Instead of going over the list of things I can’t afford – let’s look at rally suspension experiment #1. We’ll call this the GS1 for (Ghetto Suspension Numero Uno)

GS1
4 KYB GR2 struts. These are non adjustable, slightly stiffer then stock, replacement struts. They have a throw-away price of $50 each. Front SRT-4 springs. Stiffer then stock. About 1.25″ taller. Rear stock or junkyard springs. Looking for the same ride height with more stiffness.

This swap will also include replacing all of the bushings with hard neoprene ones. I already know I’m going to need the “flame wrench” for most of these. Once everything is cleaned, greased, and de-rusted – it will be reassembled.

This should give me the ride height I need, upgrade my handling to the 21st century, and last a rally. Don’t worry – I plan on having spares.

Update: PickA-Part
Over the weekend Christine, Sean, Ian and I went to the Worcester junk yard. We were able to get: Front struts, springs, knuckles, hubs, calipers, control arms, swaybar, and a power steering pump. All of this I tied together with weather-striping and carried out for $30. All you can carry – $30. Full set of front suspension spares – priceless!

WRC Rally Mexico Pictures & Video!

Click here for WRC Rally Mexico Pictures.
I took about 400 pictures, of these I’ve selected 150 of my favorites. They are in order of the rally and stages we saw.

My overall impression of WRC Mexico: We had a fantastic time. We made new friends in Mexico. The people there are great and really try to give you all that they have. We tried as best we could to spend as little money as possible and “rally with the people”. We learned that you can have an awesome time at this rally without spending $300 each on Gold VIP passes. Sure, there’s free beer at the VIP area – but It’s only $0.60 a bottle. It was very organized for an FIA event, and extremely organized compared to previous events I’ve attended. It could use some polishing, but I agree that the organizers deserved the “Inmarsat Star of the Rally” award. This was quite an effort for their first WRC event.