
|
The winter before last, Sean and I were out on the lake with the rallycars. Don Cooke approached us and asked if he could drop a GPS receiver in our cars. He explained he was doing research and taking pictures for his book. We both agreed and set out to see how fast we were really moving on the lake. The book is finally out, and rallynotes.com was mentioned along with two full pages devoted to Ice Racing! The book is oriented for kids and adults looking to have fun with this great new technology. It has a lot of ideas and details about how GPS works and how to get the very most from it. As someone who’s driven across the country twice with GPS navigation – I won’t go on long trips without it. |
Category Archives: Uncategorized
Towhooks and some paint.
The ‘Vehicle Recovery Points’ (VRP’s or towhooks) are on. Their not really even ‘hooks’ as they have to be closed eyes with a 1.5″ opening. They have to support the weight of the car (be rated for 3,000+ pounds) and be ORANGE! Not ‘orange’, but ‘ORANGE!!1!!!’. After taking some measurements and figuring out where they would bolt to the frame, I ordered some 12″ long GIANT load rated eyelets from McMaster. I had to put a hole in the rear bumper and bolt through the plastic bumper, the foam, the metal bumper and the frame. The rear one sticks out a little too much and I’ll probably end up pulling it in a bit. Otherwise someone is going to walk around the car and get it in the shin. That someone will probably be me.
Christine and I velcro’d and zip tied all of the roll bar padding in. I need one more piece for the very front of the main hoop, but the majority of it is installed. We picked up a canvas zipper bag that I pop-riveted to the co-drivers door. This allows Christine to store and grab time cards and other co-pilot related stuff without having to reach too far. Short of the camera mount and some other attachments for water and helmets, the interior is complete.
On the underside of things I’m waiting for some ‘smog bits’ to be shipped UPS before I completely button up the skidplates on the underside of the car. I coated the ‘side rails’ with bed-liner and this nasty rubberized undercoating to keep the rust and rocks at bay. Plus I now have all of the grade 8 hardware holding it on, instead of misc. random sized bolts when I was doing the mock up. I have the oil pressure sensor and the Brantz sensor pickup to install up front. This I’ll get to when I take the exhaust off.
We re-painted the front bumper. I think this is the 4th time ![]() . It ‘sort of‘ matches. By this weekend I want the car back on the ground. I’ll be getting tires mounted, logbook, registration, etc. With a full month before Gorman – this is exactly where I wanted to be. None of this running around crazy stuff 2 days before an event. We’re ready to rally.
. It ‘sort of‘ matches. By this weekend I want the car back on the ground. I’ll be getting tires mounted, logbook, registration, etc. With a full month before Gorman – this is exactly where I wanted to be. None of this running around crazy stuff 2 days before an event. We’re ready to rally.
Working at TreeLine
Saturday morning we headed up to West Covina. North on the 57 from us, only about 45 minutes away. We walked up to the worker registration inside the hotel, caught up with some friends, found David, our stage captain, and headed out to stage 3 & 4 around 9:00AM.
On the way up we had to leave a rather long dust window from the people ahead of us. It was a long 8 miles to the top of the mountain and when we got to the top we had to stop to wait for David to setup some stage markers. It was already hot too. I had the AC in the Blazer cranked. When we pulled forward after sitting for 5 minutes, the truck pulled the steering wheel out of my hands taking a sharp left. “We have a flat.” I announced. Just before we got on stage, Christine mentioned “I hope we don’t need to use the spare, as it still has a big slash in it.” Jynx.
Continue reading
Skid plate mock up.
The front plate is in place with a fresh new 15 degree bend and steel side brackets. It’s complete and ready for action. The middle plate has been re-assembled and is sitting under the car waiting for a tape measure and a steady hand. It’s a combination of 3/16″ plate and 3/16″ poly plastic and fits up under the lip of the front plate. The rear gas tank plate is 1/8″ aluminum and has been bent neatly around the back of the gas tank and secured to the underside of the trunk. All this fabrication took most of the weekend. Bending 3/16″ aluminum without a giant hydraulic brake is a bit of a challenge, and served as a bit of comic relief around the shop. The rest of the garage pictures are here.
Productive production.
A very productive day at the shop. We got the fire extinguishers installed. I had to modify the bracket for in front of the seat. The metal head extinguishers take up a bit more space. We got the trim and the interior pieces back into the car. Christine managed to shove the headliner back in by herself. I know the production rules state I don’t have to have that or the back seat in, but a little sound absorption can’t hurt. I originally spent 3 hours modifying it to fit – it’s going back in…
Big progress was made on the skidplate front. With some help from Ryan from the shop, I welded the nuts to the back of the skidplate bracket. This makes the ‘two wrench lock washer fiasco’ go away. I have the side sill attachments finished. Two 6 foot long pieces of angle iron, ready for C clips. The full length skidplate should go on her tomorrow.
Last weekend I had bare metal on the rollcage, one seat and five year old seatbelts in a dirty car.
Tonight I have a Production Spec rally car with a little bit of finish work to do.
The Rally Neon is reborn!
Pictures to follow…
Status update: #2
The roll cage has a fresh coat of white enamel on it. The door bars and other ‘chip prone’ areas have been covered with gaffers tape. It’s a great trick that I stumbled upon when using it to secure camera wires while ice racing. I covered the areas previously scratched up with my ice shoes and it held up. If it does get ripped up, I can re-apply tape, instead of re-applying 3 hours of masking the inside of the car and re-painting. This time around I painted parts of the cage that had never seen paint and added truck bedliner to the front footwells.
The seats and new belts are in. If I never take the seats out again, it will be too soon. There is about 1 inch of clearance to get the driver seat bolts out and .0025 inches to get the co-drivers seat out. Add ‘Metric Gear wrenches’ to the Christmas list. Getting the allen screws into the bottom of the seats while laying across the back of the cage, arms twisted in some impossible position, moving it less then 1/8 turn every time, is awesome.
The list grows short though. Every time I look at what’s left I say: “Is that really it?” I keep expecting another $500 item to pop up. Driving suits, pads and rotors, skidplate finishing, some bolts, some tow hooks, spare struts, spare tires, a fresh catalytic converter. This weekends efforts will be the full length skidplate and trunk mounting the tools, spares, first-aid, triangles, and tow strap.
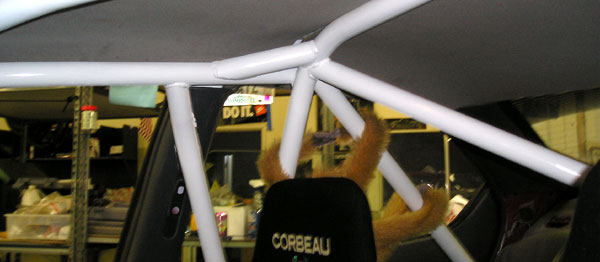
Roll cage finishing work.
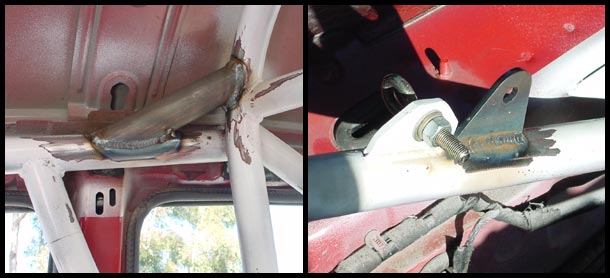
My new friends over at Blitzkrieg Motorsports have completed the final steps in order to get the car logbooked. The halo bars have been tied directly to the main hoop with tube gussets. An additional seatbelt tab was welded on each side. Plus I had the A pillar tied into the cage with two long plates. This brings the cage up to spec. The metal head fire extinguishers will be shipped tomorrow from Safe Drives and I’ll be measuring for the length of the tow hooks I’ll need this weekend.
Junkyard disappointments
Over the weekend we explored two junkyards (eco-yards, salvage yards, pick-a-part). We only found 2 Neons at the second yard in Anaheim. I was able to get some calipers, some hoses, a horn, a few interior bits, and pocketfuls of fuses and relays. I had lost the cover over the interior fuse panel as it won’t stay in place now that the cage goes through the dash. The back of that cover contains the primer for the fuses. Without it I’d be guessing what fuses did what. I found one and discovered that I don’t have a power sunroof, but I do have a spare fuse for it. I filled all the empty spots with spares and now I have a nice little paper chart that I have to laminate and stick under the dash.
The big downer came in the California law I discovered over the weekend. Even if I found a car with a full exhaust, etc. They can’t legally sell used catalytic converters. With this law I feel CA has accomplished two things. 1. Black market for catalytic converters. 2. They have kept 0.0002% emissions out of the air. Now instead of not passing smog and getting a used cat that passes the legal requirements for smog. I have to get a NEW cat (at 10 times the price) that lets me pass a smog test at a fraction of a % better then if I had a used cat. Wonderful…
The $30 ‘all you can carry’ yards are not going to be in LA or the OC. They’re going to be 300 miles out in the desert. I think I got a fair deal for $80 – but I could have done better…
We took the co-driver seat and the rear cushion out, as the car goes in for cage work this week. I showed Christine how to use the sandblaster and she cleaned off the rusty seat bracket and the front engine mount. I had that out so that I could replace the leaky oil pan gasket. I added a little black RTV sealant for added effect. No leaks so far. I’m excited that the car is back on the ground, but we still have a lot of work to do.
Powered up.

 The co-driver pod, light, and clock are all powered up and fused. I included a special circuit and regulator for the rally computer to keep it running even when I’m cranking the starter. Christine tested her foot switch horn ‘blamph’ last night. Now she can honk at people while I keep my hands on the steering wheel.
On the entry list.
We just signed up for the Gorman Ridge Rally on August 20th.
Emails, press releases, sponsors, phone calls, pdf’s, bio’s, maps and more information coming soon. Please check out the volunteer sign up, or just wait for my email / phone call to hound you. ![]()
I’m still knee deep in the wiring. Saturday I gutted what was done piecemeal and started from scratch with fresh automotive grade wire. Today I got all of the gauges to light up and all the wire fed through the firewall. I hit a dead end when I tried to find the horn switch wire. I made two educated color guesses and lost. A few more hours with the multi-meter to go.