
Let me start by letting you know that this article is going to be very technically oriented towards fixing a 2003 Dodge Neon. I’m sure some of the info will be helpful for any car built in the 21st century, but you may want to skip over the gritty details. This article will also reveal the complicated way cars check for fuel leaks and explore some of the huge frustrations of modern emissions testing. Ready to unravel a mystery? I recently learned so much about the Chrysler EVAP system that I wanted to share – in plain English – what I went through, and what I learned.
You: “I have code P0440 – what should I do?”
Every car mechanic: “Replace your gas cap!”
You: “Then what?”
Every car mechanic: “Umm… Drive around for a few days…”
You: “Then what?”
Every car mechanic: “Replace your EVAP sensor!”
You: “Then what?”
Every car mechanic: “Uhh… Drive around for a few days…”
It kills me that the number one response to an EVAP trouble code is: “Replace your gas cap.” To me, it is the PC tech equivalent of replacing a USB cable and driving around after is like “rebooting it”. You have an intermittent problem that needs diagnosing and it’s easy for everyone else to just throw parts at it, but what are you actually fixing?
The basics: What is the Evaporative System?
Your car holds fuel. Your car is not allowed to let that fuel vapor leak into the atmosphere. If it does need to, it needs to pass it through a charcoal canister first. Whenever possible, your engine should burn that vapor off. Those vapors are drawn with engine vacuum to the throttle body. So if fuel vapor is not coming out of the charcoal canister or into your throttle body – it’s considered leaking.
Your gas cap, the fill tube, the vent pipe, the canister, the sensor, the hard line that runs under your car, and the purge solenoid that opens vacuum to the throttle body – are ALL part of the EVAP system! The computer (ECU / PCM) uses one very sensitive sensor called the Natural Vacuum Leak Detector (NVLD) to check all of this stuff. It also happens to be a frustrating piece of crap. 😛
Gasoline in a sealed container will expand and contract based on temperature. If the gas tank heats up, it builds a small amount of pressure. If the gas tank cools down, it draws a small amount of vacuum. The principal being that you drove around during the day, parked, and it got cool overnight. The car checks this with all of it’s temperature sensors when it’s running, looks at how much gas you have in your tank, and knows when vacuum should be achieved.
The complications: How sensitive is it? What breaks it?
The NVLD activates around 7 inches of H2O. Or in normal people speak: 0.25 psi. It is designed to detect a leak 0.5mm small! Literally a pin hole anywhere in any of the EVAP hoses from the front of the car to the back and the system will fail. A PIN HOLE.
Once I learned that the car keeps track of when the tank pulls a vacuum after it was run. (yes the circuit and computer are still active after the car is off) I started to realize how many ways that you could get this code without anything actually being wrong! You see the logic is written for a commuter car. A car that will be driven around in the day and parked at night. The car keeps track of 2 trips to see if this has happened. What if you work nights? Let’s say in a place where the day to night temp swing is a less then 30 degrees? What if you drive from the mountains where it was cold in the day to the desert where it’s hot at night? What if this is just a weekend fun car for autocross, rallycross, or track days? What if you trailer your car? It’s entirely possible through NO ACTUAL FAULT that you could get a EVAP failure code. Basically because you “are weird” and didn’t drive to work today and park the car in your driveway overnight five times this week.

It gets worse…
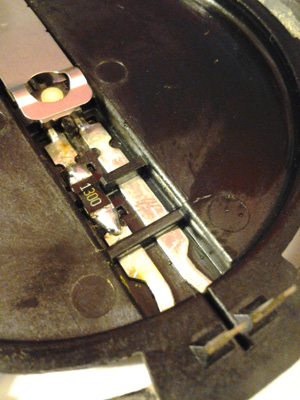
The NVLD is located next to the back right wheel. The filter is exposed to probably the worst dust that you could get anywhere on the car and it’s sucking it in constantly. (filter shown in the picture above as the round thing near the Y in assembly) So if you happen to live on a rural dirt road, and that’s part of your commute, the really fine “moon dust” will eventually make it into the NVLD and the seals (holding back all of 0.25 psi of vacuum) will fail. Mine was full of fine dust and the car has seen only 4 rallies.
and then there’s this…
Fuel manufacturers are putting more and more Ethanol (10%+) E10 into our fuel mixtures. I’m not going to get into the geopolitical problems of trading food for fuel here, but ethanol is great for drying out rubber and as a solvent. Cars made on or after 2001 are supposed to be able to handle it, but any rubber hoses are going to fail faster the more ethanol is introduced.
 I tried a few electrical tests and got nowhere fast. Like the good hardware hacker I am – I ripped it off the car and opened it up to have a look. The first thing I did was to identify the resistor on the inside. It’s a 130 Ohm resistor and it connects to ground when it sees that tiny amount of vacuum. That is, it connects when it’s soldered correctly… This $0.013 part was probably a bad choice for a sensor that will see rear wheel levels of vibration and it was covered in flux and two small cracked solder pads. This pic was taken after re-soldering. I get that “real metal” and “proper resistors” cost money, but this part is manufactured to be as cheap as possible.
How it works: Get ready for testing!
The switch will ONLY activate when it sees vacuum. So you will need a hand vacuum pump and a good ohm meter that also checks continuity. Alligator clips help when testing this off the car.

Here is the pin-out for the sensor. Keep in mind this is the plug you’re looking at so the connector will be the opposite. If you look real close you will see a + and – on the base of the connector. The first step, before opening this up and letting the magic out like I did, is to apply a vacuum to the “canister” side of the NVLD (not the filter side). Then check the resistance from the center pin to ground (pin 2 to pin 1) and make sure it’s more than 100 Ohms. That should hold steady for a while (many minutes). Make sure the hoses between your hand pump and the unit are tight. It’s .25 of a psi, and when you pull more than that the bottom diaphragm opens. So don’t look for your pump to show anything on the gauge, look for the NVLD to sense vacuum.
If you don’t ever see 130 Ohms, or it stays on for only a few seconds – you’ll need to replace or repair the NVLD. You can test the solenoid by hitting the + (pin 3) with 12 volts and the switch will open. If your NVLD passes this test it means that there is a leak in the EVAP system, but my guess is that your NVLD WON’T PASS this test and will need a fix.
 Carefully pry back the tabs and hold them open with a couple of flat-head screw drivers or I used popsicle sticks. The NVLD has two diaphragms. The top one senses vacuum to the micro-switch, the bottom one holds back vacuum or pressure and opens with the solenoid to vent vacuum or pressure. If you’re really curious how this works, there is a small channel near the switch connector that provides air from the lower chamber.
What I found works exceptionally well: Dielectric Grease
Also known as spark plug boot grease – it’s silicone based and won’t degrade the rubber or the material (probably silicone) that these diaphragms are made from. I coated the surface of the metal on the solenoid side and wiped off the excess. I wouldn’t goop it on, but it cleans off the dirt and makes the rubber seal again. I went around the edges and cleaned the dirt off the top cover with some Q-tips.
Test the resistor directly with your ohm meter now. Be careful not to tear anything or mess with the metal spring that works with the switch. Does your resistor show 130 Ohms consistently? If not you’ll need to re-solder it. Reassemble and test again!

Back on the car!
You can test the whole system (from the gas cap to the purge solenoid) by separating the line that runs from the purge solenoid to the hard line going back to the gas tank in the engine bay. With your NVLD back in place, connect your vacuum pump to the hard line and pump it 10 times or so… You will see 130 Ohms when vacuum is reached at the NVLD. The continuity tester is helpful here because you can make most meters beep when this happens from the back end of the car. Make sure it senses that vacuum for “a long time”. If it fails to hold for a few minutes you probably have an actual leak in your EVAP system. Keep in mind you won’t see anything on your pump gauge.
Inspect and clean the rubber seal on the gas cap and look to see if the plastic fill surface is marred at all. It’s not like you jam a metal nozzle into this while refueling… 😉 A small nick here (pin hole remember) can be the cause of your issues. I really dislike how the “never over-tighten” clicking gas cap is working against you in sealing leaks. Crank that puppy three times whenever you re-fuel!
Check to see that the purge solenoid is holding vacuum with your pump (this time use the gauge). Inspect the lines from the purge solenoid all the way up to the back of the throttle body. If you do have a leak, this will narrow down where it’s coming from. Inspect the hoses going to and from the canister. Check the hoses going from the hard line. Check the hose going up to the vent pipe in the fuel fill area. Maybe your canister is cracked? Now it’s time to throw parts at it. 🙁
Fixed it? How to check:
The best way to test this is to clear the fault code with a reader (some shops will do it free) then take the car out for a drive just after sunset. You don’t need to go 30 miles… You don’t need to do 50 stop and goes (or any other crazy car mechanic test procedure myths). Start the car and let it warm up for a few minutes. Drive reasonably around for a couple miles. Get the car up to highway speeds for at least a minute. Then park the car outside overnight. If it’s cold out make sure the car warms up enough to turn the fans on once. That’s key on – warm up and drive around – 55+MPH for a min – back in the driveway – key off. I did it while picking up pizza. 2 hours later I checked that the NVLD was sensing vacuum (by seeing if the red wire (pin 2) had continuity to ground) and everything was working! I would do this 2 more times before running off to pass emissions (two trips remember). At this point don’t unplug anything if you can – the computer is always watching you! 😮
I had both a faulty resistor (which I discovered is not in all of the Chrysler NVLD’s 😡 ), and I had dust keeping the 10 year old diaphragm from sealing. I’m probably going to need to replace the vent filter, and if you live on a dirt road you should add that to your yearly maintenance. I found it comical that there are plastic clips on the one hose to the NVLD, but all the other hoses are just pushed on – and I was actually sort of shocked that the whole system holds vacuum from the throttle body all the way up to the gas cap. The method the computer uses to test is prone to error if you do anything but commute, and I will keep track of when I start and stop the rally car to ignore false CE lights. As always – Your Mileage May Vary. Good Luck!
Dude. On the 2GNT DSM, this is commonly referred to as “CEL 31.” If you remember “Daisy,” she first got this Evap/Purge BS code on one of my recce trips to Arizona prior to relocation, so sometime in 1999. Daisy was 3 years old at that time and, interestingly, the CEL came on as I was low on fuel in Flagstaff, which is to say at altitude.
Local dealer (still had warranty) told me to make sure the gas cap clicked twice when filling up and to – you guessed it – drive around a few days. Not enough billable hours at that point.
Fast forward a bit. Daisy never got Arizona plates. I kept my Kansas tags so long as I had a student ID to support getting them by mail. Once my student ID failed, it was pre-OBD, full-time AWD time, at which point emissions testing became a 10 second idle sniff.
On the 2GNT, the Evap vent and purge solenoids are located behind the splash shield in the front passenger-side wheel well. Cannister is inside the engine bay on the K-member. I replaced all of the above in pursuit of that elusive code (plus the gas cap) to no avail.
I’d heard rumors there was another solenoid on top of the fuel tank which had a tendency to suffer from ruptured membranes, but I never dropped the tank to check. In any case, the kid who bought Daisy reported his mechanic repaired the code and she passed OBDII emissions the next day.
T’was the end of an era. I miss that car. I do not miss my Evap Code-Pilot.
I went over and posted this for my 2GN peeps.
Now that I understand how it works I want to smash it to bits! I originally wanted to just try and fool the sensor, but it’s really complex as to how it works. After SD logging and oscilloscopes got involved I decided it might just be easier to fix the damn thing. The big break (and I need to mention this again) was the Dielectric Grease. That is the difference between it working and not working on my car.
– Kris
Followup – Car just passed with flying colors. EVAP Achievement unlocked!
I didn’t go into detail with the tech that the NVLD and most of the system was scattered all over my garage floor for testing and discovery last week…
Good Luck!